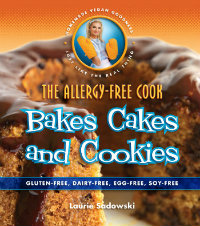
This time of year the end of aisle displays include packages of flour and sugar stacked up like a brick wall, vanilla, scary looking red and green petrified fruit, and all manner of baking supplies. For those of us who bake for special diets, such as gluten free or vegan, our supplies are off the beaten path. Sometimes they can only be procured at health food stores or online. However, lately I have seen more and more options in the "regular" stores, such as millet flour, coconut sugar and agave nectar. These new found conveniences can be put to good use with two great new "from scratch" cookbooks for special diets. The first in her continuing series, Laurie Sadowski presents gluten-free, dairy-free, egg-free and soy-free goodies in The Allergy-Free Cook Bakes Cakes and Cookies. If you're hankering for the comforting smell and taste of home baked bread, try Gluten-Free Bread: More than 100 Artisan Loaves for a Healthier Life by Ellen Brown .
The recipes are clear, but the ingredient list can seem daunting. Don't be discouraged. Just gather your ingredients incrementally, and like any recipe, read through it first. The other downside is I would have preferred more pictures of the actual desserts. The pages are jam packed with black and white pictures of bakeries from around the world, which is charming, but there are only a few of the actual desserts and several of the author in retro-50's housewife gear. The bakery pictures, I suppose, are a nod to the international variety of recipes in the book, but I believe most people want an idea of what the finished dish will look like.
Lastly, the author provides a comprehensive explanation of ingredients, nutritional information for gluten-free flours, as well as tips to help you in this specialty area of baking. Overall it is a winner for the home baker who enjoys using quality ingredients for fantastic results.
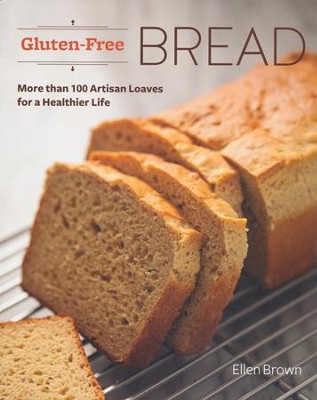 In Ellen Brown's new book, Gluten-Free Bread, the seasoned cookbook author has brought us a volume with an extensive array of breads, focaccias, bagels and almost all the savory, gluten-free baked goods one could want. From Muesli bread to French Baguette to Traditional English Dried Currant Scones, even Cornbread Stuffing-- this book has got it all.
Brown provides a thorough explanation of flours, yeast and the overall processes necessary to achieve great bread without the essential ingredient that makes bread so deliciously "bready"--gluten.
The photography in Gluten-Free Bread is worth mentioning as well. Steve Legato's artistic photos give a clear rendering of what to expect from the finished product.
The recipes are clear and easy to follow. As the subtitle states, these are "artisan" recipes, implying they are crafted by those who care to take the time for a superior product. I made the challah recipe in individual Bundts; each one really is enough for 2 servings. They looked adorable and tasted yummy straight out of the oven. Like most gluten-free breads, they are best freshly baked or warmed up in the oven.
Whichever book you choose, these make great gifts and are sure to keep the recipient occupied in the kitchen for a long time.

My kid's really liked this one. The real orange zest and juice give this bundt cake a really great fresh, vibrant taste. I subbed all-purpose gluten free blend for the other flours in the cake, and it came out fine.
Chocolate Chunk-Orange Bundt Cake
The Allergy-Free Cook Bakes Cakes and Cookies by Laurie Sadowski, p.p. 30-31 (note: I have condensed the text of the recipe).
Cake:
1 1/4 cups sorghum flour, plus more for sprinkling the pan
1 cup millet flour
1/2 cup plus 1 Tablespoon tapioca flour
1/4 cup arrowroot starch
2 teaspoons baking powder
1 1/2 teaspoons xanthan gum
1 teaspoon baking soda
1 teaspoon fine sea salt
1 1/2 cups unrefined cane sugar
2/3 cup coconut oil, melted
1/4 cup finely grated orange zest (about 4 large oranges)
1/4 cup freshly squeezed orange juice
1 Tablespoon ground flaxseeds
2 teaspoons vanilla extract
1 3/4 cups vegan buttermilk (for each cup, mix 1 Tbsp. vinegar into non-dairy milk (i.e. soy or rice milk))
1 1/2 cups nondairy semisweet chocolate chunks or chips
1 Tablespoon cider vinegar
Orange Drizzle:
1/2 cup confectioners' sugar, sifted
1/2 teaspoon finely grated orange zest
2 Tablespoons freshly squeezed orange juice, plus more as needed
1/4 teaspoon vanilla extract
Chocolate Ganache:
2 Tablespoons nondairy milk
1 1/2 teaspoons coconut oil or vegan buttery spread
1/4 cup nondairy semisweet chocolate chips
To make cake: Preheat oven to 350F degrees. Lightly oil a 10-inch (12 cup) Bundt pan. Sprinkle with sorghum flour, tapping out excess.
In a large bowl, whisk together first 8 ingredients.
Put the sugar, coconut oil, orange zest, orange juice, flaxseeds, and vanilla in the bowl of a stand mixer or large bowl. Mix on medium-low speed; beat until well combined.
Turn the mixer to low. Alternately add the flour mixer (3 additions) and buttermilk (2 additions), beginning and ending with the flour mixer, beating well after each addition. Turn off the mixer.
In a small bowl, toss together the chocolate chunks and 1 tablespoon tapioca flour, until well coated. Add the chunks to the batter, stirring with a spatula until evenly distributed. Immediately stir int he cider vinegar until just combined.
Scrape the batter into the prepared pan using the rubber spatula. Smooth the top with the spatula. Bake in the center of the oven for 40 to 45 minutes, until the toothpick inserted in the center of the cake comes out clean. The cake will be golden brown, begin to pull away from the sides of the pan, and will spring back when lightly touched.
Let cool in the pan for 10 minutes, then invert the cake directly onto a serving dish. Let cool to room temperature before you prepare the drizzle and ganache.
To make the drizzle:
In a small bowl, stir together the drizzle ingredients until smooth. Stir in up to 1 tablespoon additional orange juice, 1 teaspoon at a time, as needed to achieve a runny consistency.
To make the ganache:
In a small pan, heat the nondairy milk and coconut oil over medium heat until the oil is just melted. Immediately remove from the heat and stir in chocolate chips until they are melted and the mixture is smooth.
To assemble:
Spoon the drizzle and ganache over the cake, letting them run down the sides. The drizzle and ganache can be applied alternately or the drizzle can be applied firs,t then the ganache. Serve at room temperature.
Store in a sealed container. The cake keeps for 3 days at room temperature, and 2 months in the freezer.
Yield: 12 servings
Popovers are a perennial favorite at holiday dinners. If you are dairy allergic, you can substitute soy, rice or help milk and non-hydrogenated margarine for the butter. However, they do require real eggs for their signature airy texture.
1/2 cup brown rice flour
1/3 cup potato starch
1/4 cup tapioca flour
1/2 teaspoon fine salt
1/4 teaspoon xanthan gum
1 1/4 cups whole milk, heated to 90F or 38C) degrees
4 large eggs, at room temperature
3 tablespoons unsalted butter, melted and cooled
Pre-heat the oven to 400F (200C) degrees and grease a 12-cup popover pan or muffin pan.
Combine the rice flour, potato starch, tapioca flour, salt, and xanthan gum in a deep mixing bowl. Whisk well.
Combine the milk, eggs, and melted butter in a blender or food processor fitted with the steel blade. Blend until smooth. Add the flour mixture and blend until smooth.
Ladle the batter into the prepared cups, filling each two-thirds full.
Bake for 25 minutes, without opening the oven door. Lower the oven temperature to 350F (175C) degrees and bake for an additional 10 minutes, or until the tops are browned. Remove the pan form the oven and allow popovers to cool in the tins for 5 minutes, then serve immediately.
Note: The batter can be made up to 4 hours in advance and kept at room temperature. Blend it again to distribute the ingredients before filling the cups. The popovers must be baked just prior to serving.
Variations:
Add 2 tablespoons of chopped fresh herbs (rosemary, thyme, sage and parsley) to the batter.
Add 1/2 cup freshly grated Parmesan cheese to the batter.
Yield: 12 popovers
Note: The recipes below are not necessarily gluten free, but are part of a blogger link-up.

The Kosher Connection, an informal group of creative kosher food bloggers from all around the world, proudly present our monthly kosher recipe challenge. Each month we will present you with recipes on a different theme from all the kosher food bloggers.
This month is Comfort Food! Follow our recipes on Twitter with #KosherRecipes.
| | | |
| | | |
| | | |
| | | |
| | | |
| | | |
| | | |
| | | |
| | |









No comments:
Post a Comment